Availability Templates Setup
Follow
This article will walk you through the process of configuring the Availability Templates. Adding, Updating, and Cloning the Availability Templates. Additionally, this article will assist in explaining the Availability Template's configuration property.
In this article:
- Overview
- Access The Availability Templates
- Add A New Availability Templates
- Alternating The Zone Of The Availability Templates
- Clone An Availability Template
Overview
Availability Templates define the location and times of resource availability to allocate to routes based on the basis of your Business Unit schedule.
Vonigo provides you to build or customize your availability templates to optimize your Business Unit resource management and allocation. Availability templates are commonly created during the initial system Business Unit setup. A new availability template can be created over time when your Business Unit's availability of hours, location, service you provide to, and resources grows over time.
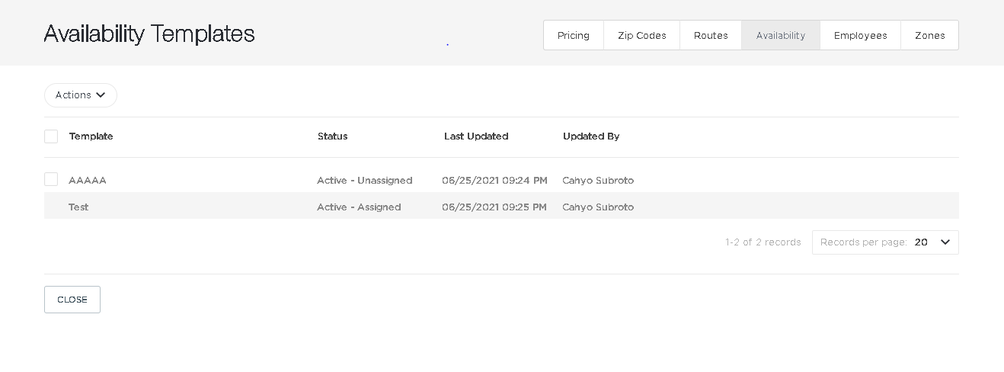
Access The Availability Templates
To access the Availability Templates in Vonigo:
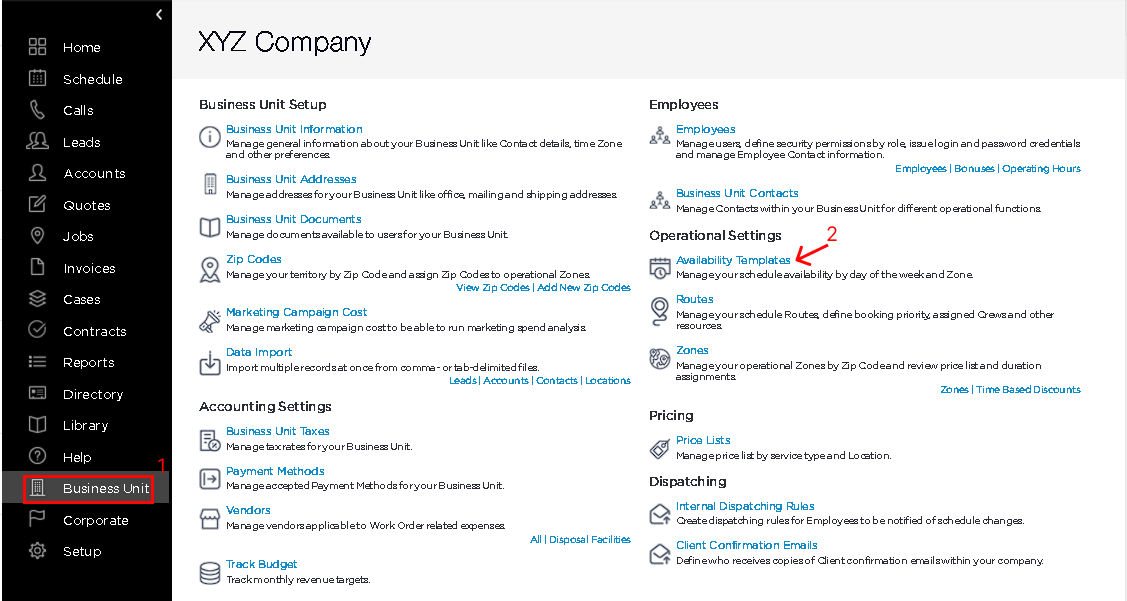
-
Click on the Business Unit.
-
Under the Operation Settings, select the Availability Templates.
Add A New Availability Templates
To add new Availability Templates in Vonigo:
-
Follow the steps above to open the Availability Templates.
-
A new window will appear after selecting the Availability Templates.
-
Click Add New Availability Template on the right-side, under the ACTIONS menu.
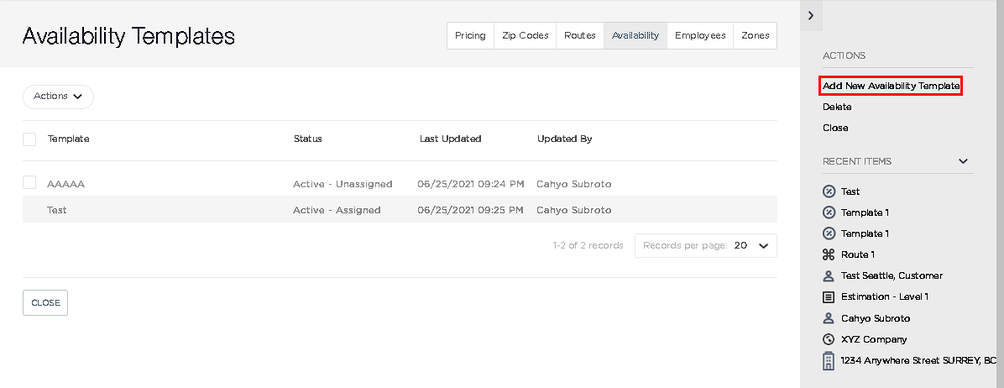
-
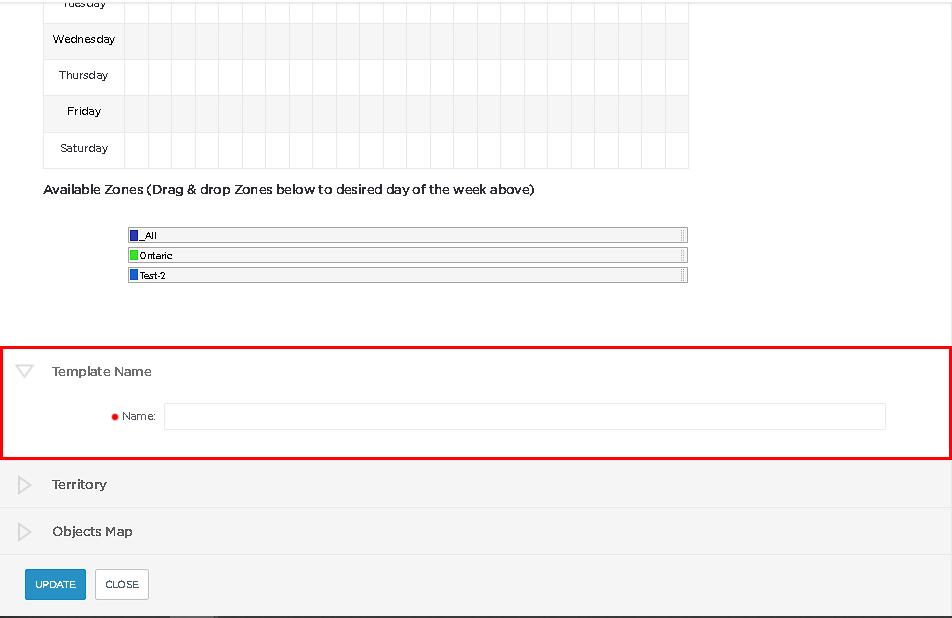
Enter the Template Name
| Configuration Property | Description |
| Available Zones | This is the section where you organize and manage the schedule avail day of one week. |
| Template Name |
This is the section to name the availability template. |
| Territory | This is the section where you can select your Business Unit’s operation region. |
| Objects Map | This section details the operation map's flow. |
Alternating The Zone Of The Availability Templates
This section describes in detail how to alternate the zone of the availability templates based on four different methods:
Add Zones To The Available Day(s) Of The Week
Create Zones for the day(s) on the Availability Template Calendar to indicate the times and locations of resources that are available. This method can be repeated for each additional zone:
-
Select the Zone you want to add to the available days of the week.
-
Click the Zone, then drag and drop the Zone bar to an available day of the calendar provided.
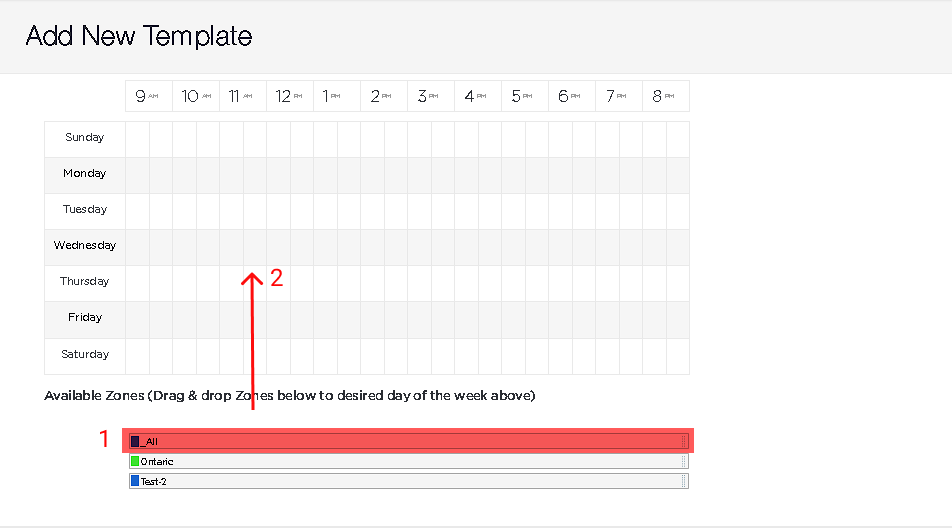
Note: The mouse should be in the number one position by clicking it to pick the zone and enable dragging.
To remove the Zone bar from the available days of the week:
-
Simply click the color next to the Zone bar name then drag it off of the available days of the week.
Note: The mouse should be in the number one position by clicking it to pick the zone and enable dragging.
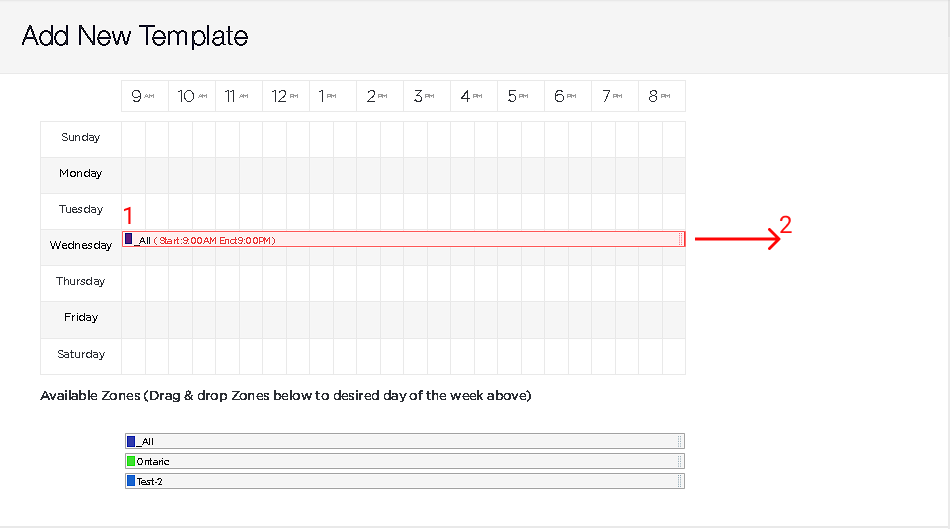
Adjust The Zone Availability Durations
The Zone bar is automatically added for the full entire day, to adjust the Zone Availability durations:
-
Click on the Zone Bar right-end edge until the double-arrow appears.
-
Drag it to the left to shorten the Zone Bar Availability Duration.
-
Drag it to the right to lengthen the Zone Bar Availability Duration.
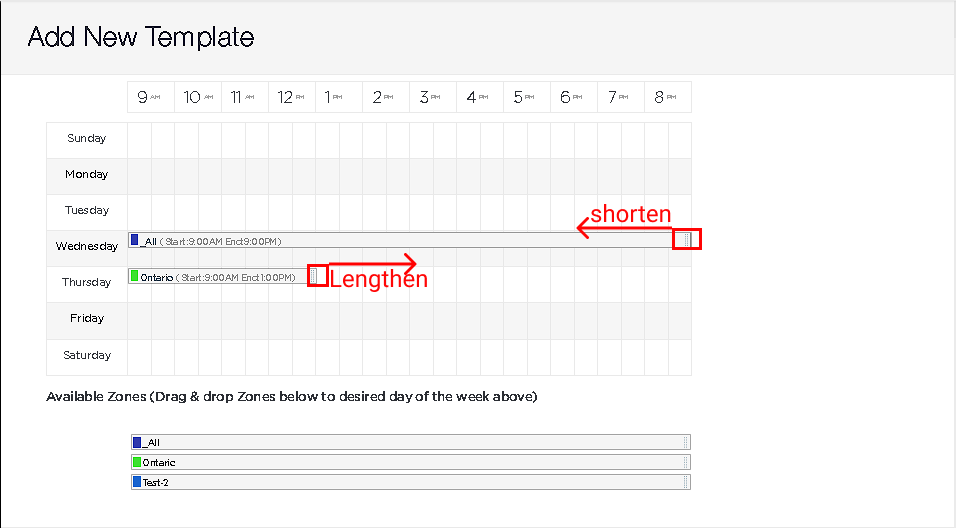
Note: The mouse should be in the selected zone by clicking it to pick the zone and enable dragging.
Adjust The Zone Availability Start Times
The Zone bar is automatically added for the full entire day, to adjust the Zone Availability start times:
-
Click on the Zone Bar left-end edge until the cursor turned into a cross-hair.
-
Drag it to the right to the desired start time.
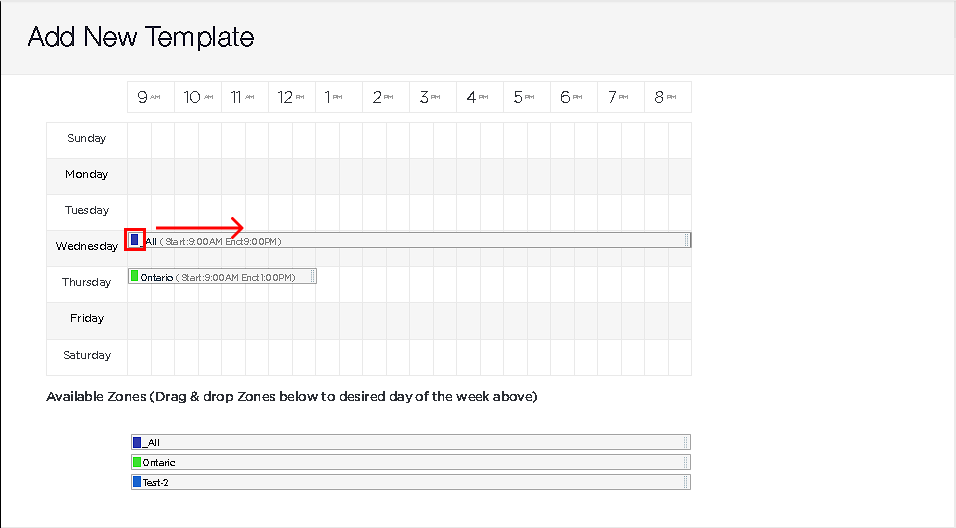
Note: The mouse should be in the selected zone by clicking it to pick the zone and enable dragging.
Create The Time Intervals Within The Same Days On The Week
Establishing defined intervals enables you to constrain the resources you must supply to your consumers while still providing them with options. The duration times must be equal to or greater than the appointment time.
To create multiple intervals of Availability Templates for the Zone Bar on a single day of the week:
-
Select the desired Zone Bar.
-
Click and Drag to the desired day, repeat with any Zone Bar place it on the same day as the previous one.
-
Adjust the duration of each Zone Bar, and move it to the right or to the left as you desire.
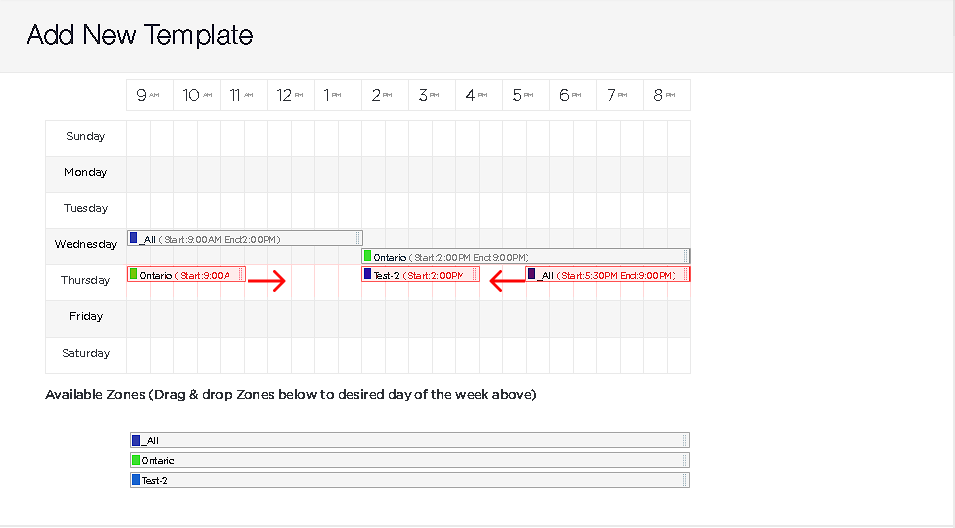
Note: The mouse should be in a selected zone by clicking it to pick the zone and enable dragging.
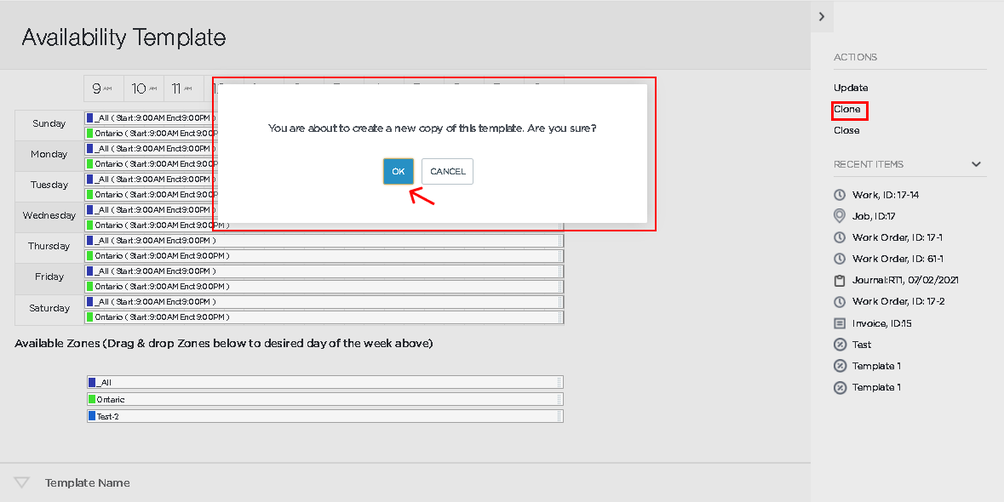
Clone An Availability Template
You can clone the availability template along with its configuration property. To clone an Availability Template:
-
Click on the Desired Availability Template that you want to Clone.
-
Under the ACTIONS menu, click Clone.
-
A new notification will pop out, Click OK to continue.
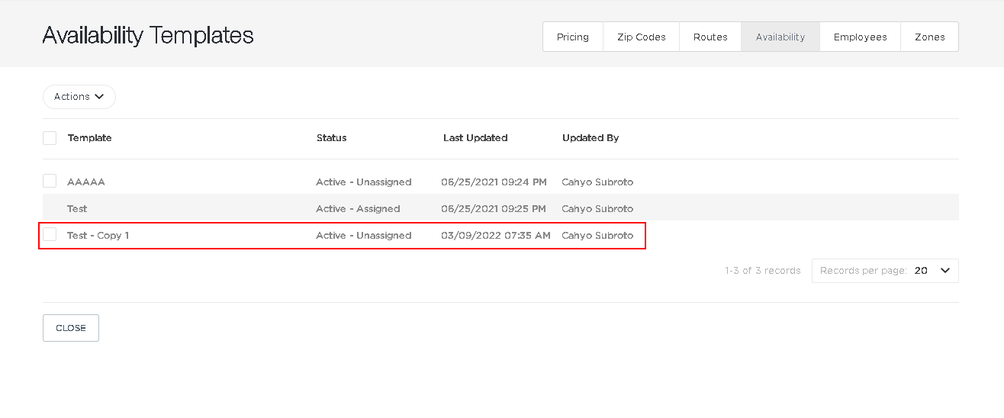
-
An Availability Template Clone will appear on the list.